


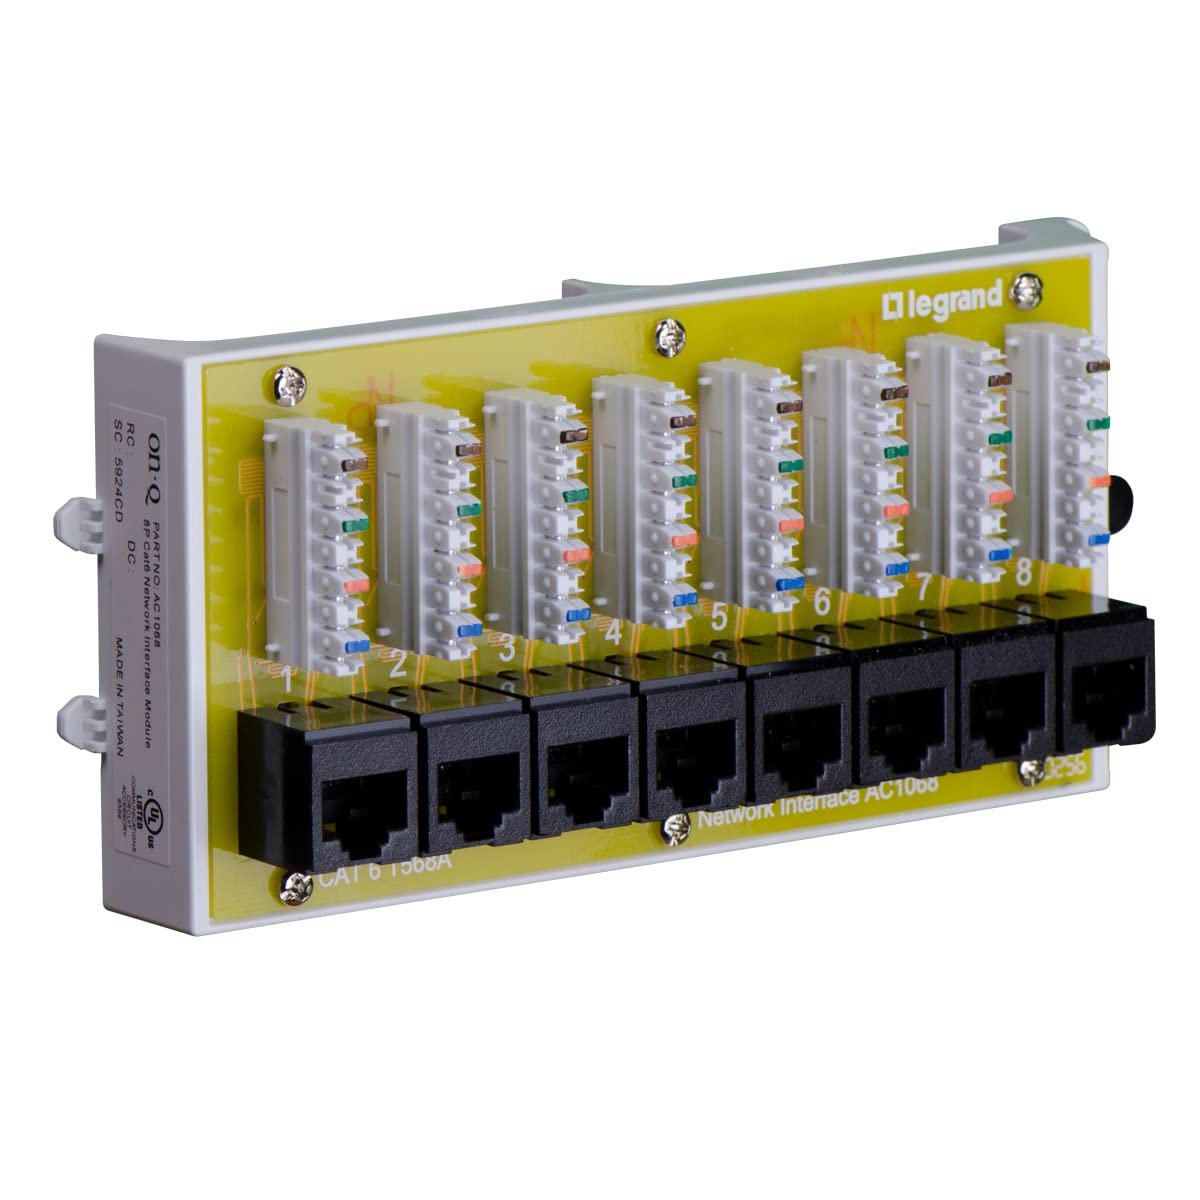
Legrand - OnQ Cat 6 Network Interface Module, Wifi Module with 8 Ports, Network Interface Module Cat6 Provides Connectivity to Ethernet Devices, Black, AC1068
Details
- BrandOn-Q
- Hardware InterfaceEthernet
- ColorCat 6
- Compatible DevicesComputers TVs
- Product Dimensions1.5"L x 2.9"W
- Data Link ProtocolEthernet

Description
🔗 Connect Like a Pro!
- USER FRIENDLY DESIGN - Front-mounted terminals for hassle-free access and installation.
- SEAMLESS CONNECTIVITY - Easily connect up to 8 devices with punch down termination.
- STRUCTURED WIRING READY - Fits seamlessly into all On-Q structured wiring enclosures.
- VERSATILE COMPATIBILITY - Perfect for computers, TVs, gaming systems, and streaming devices.
- INDUSTRY STANDARD EXCELLENCE - Exceeds TIA/EIA 568-C.2 standards for reliable performance.
The Legrand OnQ Cat 6 Network Interface Module is a versatile and high-quality solution for connecting multiple Ethernet devices. With support for up to 8 Cat6 or Cat5e data lines, this module ensures seamless connectivity for your home network. Its user-friendly design and compatibility with various devices make it an essential addition to any tech-savvy household.


Specifications
| Manufacturer | Legrand On-Q |
| Part Number | AC1068 |
| Item Weight | 6 ounces |
| Product Dimensions | 1.5 x 2.9 x 6.41 inches |
| Country of Origin | China |
| Item model number | AC1068 |
| Size | 8 Port |
| Color | Cat 6 |
| Style | Cat6 |
| Material | Plastic, Cold Rolled Steel |
| Item Package Quantity | 1 |
| Number Of Pieces | 6 |
| Certification | UL, EIA, TIA |
| Included Components | Network interface module |
| Batteries Included? | No |
| Batteries Required? | No |
Reviews
S**Y
Almost fits
Good quality product. Works very well. Only comment is that it didn't fit my OnQ board exactly. The dimensions were all correct, but the tabs that you insert first were just a tad too thick. They would go in their holes, but they would bind up when you tried to hinge the board down. I had to use some sandpaper and round off those two tabs a little. Not much. Took maybe 10 seconds.
A**D
Worked great
As many have noted the color code uses the European standard so you have to swap the green and orange wires. Otherwise, worked great. I like that the CAT mounts from the front which is way easier than from the back. Doesn't look as clean, but once the box is closed no one knows.
M**1
Watch your wiring standards!
I installed this in my daughter's new house. The builder installed an empty Legrand structured cabinet and pulled the wires (Cat5e and Coax) into it, but didn't terminate them. The installation of this interface module was was a bit tricky. It is awkward to install this module into the cabinet because the back of the cabinet is rather flimsy plastic. It took several minutes to get the pins lined up and snapped in, just right. Once that was done, punching down the wires was easy with a proper 110 punchdown tool.The module is only color coded for the older 568A wiring standard instead of the more modern 568B standard. The builder elected to terminate a handfulsome of the wires with the 568A standard, so I had to terminate them to this module with the 568A standard. I terminated the remainder of the bare wires left dangling out of the drywall in the various rooms with the 568B standard. Therefore, I had to use the 568B standard when I terminated those wires into this module. As long as you use the same standard on both ends of the cable, it will work fine. You just have to watch what you are doing and test each termination with a cable tester when you are done.Of course, the builder neglected to label any of the wires, so I had to trace each wire using a wire trace tool.Bottom line, this is not always as easy as it looks and you must do your homework when using one of these. Honestly, I have never used Legrand products before, but I would not choose their line of products for any home I was building. In this case, I had no choice.
R**H
Easy Install, Works Great
Snapped right into an On-Q panel in a house built around 2002. All of the Cat5 jacks were wired as phone ports with regular Cat 5 cable, but fortunately they had also run Cat 5e cable to some of the ports (zip tied to the Cat 5 cable). I needed this to hook up unterminated Cat 5e cable in the wiring closet to an 8-port ethernet switch (I only needed 6 ports).
R**S
Nice cat6 panel. Watch out for wiring
Depending on your cabling may need to switch between T-56A or B during punch down.
B**K
It's 568A, not 568B. Beware.
Most residential wiring is done tia-568B but this device is wired for A. Just be aware.
S**.
Lucked out with the fit and function
I took a total gamble on this module, hoping that if I swapped it with the existing telecom module in the wiring panel that my wired ethernet ports throughout my home would function correctly. Anyways, after removing the old module, using a punch-down tool to terminate the existing wires to this new module, I was really hoping I did everything correctly.Turns out, I did, for the most part. After hooking up a an ethernet switch, I got my most desired ethernet port working in a the wall outlet downstairs. Success! And it was running at 500 Mbs (the speed I'm paying for). Another wall outlet port was also working, but only at 80 Mbs, so I'll have to re-check the wiring on that one, as it may be wired wrong at the wall (A vs. B).In any case, you just have to hope that the existing wiring infrastructure is good wherever you install this module, as there are some many variables that can affect speed / performance. One final note, this module fits perfectly in my existing OnQ panel box and the plastic tabs lined up to the holes, no problem. It was an exact swap of the old (non-functional) telecom module.
M**M
Works very well with a leviton wireless box if you are confident in drilling holes yourself
Works wonderfully and the cat6 wires crimp on well. This wasn't made for the leviton wireless box which meant I had to drill an extra hole to accommodate the press button that locks the block in place. I forgot what size drill bit I used, but start small and work your way up slowly bit by bit and it'll snap right in
Common Questions
Trustpilot
3 weeks ago
3 weeks ago
