🚀 Elevate Your CNC Game with Precision Power!
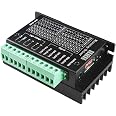
The Twotrees Stepper Motor Driver TB6600 is an upgraded, high-performance controller designed for NEMA 17, 23, and 24 stepper motors. With a power output of 4A and a voltage range of 9-42V, it supports various applications including CNC machines, laser cutters, and engraving devices. The driver features advanced microstepping capabilities and essential safety protections, making it a reliable choice for professionals seeking precision and versatility.
K**N
works great
nice quality part
O**M
Here are the wire color codes you are probably looking for :-)
This is not a review, per se.It is a post of the motor wiring color codes that TwoTrees accidentally forgot to provide, and some other stuff that might helpyou.First, the motor model I am reporting on is TwoTrees 17HS4401. (TwoTrees offers several in the 17 series size, but this is what came with my stepper motor + motor driver module kit) IF you didn't get the 17HS4401 motor with your kit, you can go to the TwoTrees store from Amazon to find more information about this and all their 17 series motors at that page. "Visit TwoTrees Store" to find it all.QUIRKS: Note that this particular motor pinout header has six pins present. However, only four are utilized in the supplied harness with this kit, which is fine. They are;Black: A+, Green: A-, Red: B+, Blue: B-So, this is a four wire bipolar stepper motor. Connect those wires per above code to your "high voltage" output of the motor driver per the labeled header connections and you're good to go on that part. The motor side integration into the controller is obvious, but requires a little extra work. You must cut the header pin jack off the 4 wire cable. Make sure you cut the correct end of the supplied cable - one is four pin one is six pin. The six pin fits the motor. The other is four pin, and does NOT fit the motor. THE FOUR PIN HEADER IS THE ONE YOU WANT TO CUT OFF. If you carelessly cut off the six pin end, you'll be doing remedial soldering, because the SIX PIN PLUGS INTO THE MOTOR :-)Anyway, cut and strip the wires to connect to the screw terminals on the motor driver.Unfortunately, from there it gets more murky, because the microstep driver schematic for integration into Arduino (for example) is not included in the kit. You will have to hunt around on the WonderWeb to find that, or use your preexisting knowledge to make it work. Expect to wade through a lot of bad answers and half-guesses. I did. The most useful piece I found was this wonderful video from MYTECTUTOR. It very clearly lays out the proper use of the TB6600 module with your basic Arduino UNO, etc. You can find that video here (not me - but it is clear and helpful)https://www.youtube.com/watch?v=idVcItHfGS4Don't forget to check the DIP switch settings on the motor driver to match your application. Mine were set 2 and 4 on which is 1000 pulses per rev and 8 steps @ 3A. I think 3A may be a little ambitious for this driver?Motor claims a wide operating voltage range. I am going to use 24V, which is kind of in the middle. If your motor runs hot, try increasing your supply voltage. (counterintuitive, but I'm an old motor and vacuum tube guy from the long-lost analog days, not some guy making his first robot. :-)Good luck. Don't let the magic smoke out.
J**K
Good price, exactly as described
Needed a replacement for my plasma table Z axis. This seemed to cheap to be correct and given it is likely China fab I didn't expect it to ship so quickly.It is the exact replacement and shipped on time. Good purchase. I added this to my bookmarks so when the next needs replaced I have a source.
D**H
Working great! Currently driving my awesome DIY CNC Plasma cutting rig!
The media could not be loaded. I built my own DIY CNC Plasma cutting rig. The motion control system is the free, open-source LowRider v3 CNC from V1 Engineering. The control software is the open-source LinuxCNC (using the free QTPlasmaC graphical user interface) running on a used old Acer laptop (with touchscreen). The drivers are these TB6600 Microstep. The ethernet breakout board is MESA Electronics 7i96-S. The automatic torch height control is MESA Electronics THCAD-2. The drivers, breakout board, power supplies, EMI filter, and fans are housed a control box built from a gutted desktop PC tower. The plasma machine is the Hynade CUT60DN. Great stuff. The plasma machine and almost everything in the control box was bought from Amazon. The rig works great. I'm super pleased.
C**N
Works well for Motorizing my Homemade Camera Slide-Rail.
Works just like it was supposed to. I’m using it to motorize a homemade, camera slide-rail (see photo). Currently using a PWM signal generator with variable control to operate the driver, but will modify later with arduino to allow me to operate the slide-rail in micro-steps for time lapse photography while utilizing camera shutter input.I’m using the current setting DIP switches (SW 4~6) for 1.5A and motor operation is smooth, although the motor is a little too noisy for video-photography in a quiet setting like an interview. However, a directional mic aimed at subject might be able to isolate the motor noise. I am very happy with the quality and price of this product and will be buying a second motor and driver from this seller to use on another project.
**O
It's not what it seems. Don't buy it
I purchased the DM556 driver, but I noticed it doesn't work for what I need. I found it strange, so I uncovered it.To my surprise, the motherboard clearly indicates that it's not the DM556 driver, but the DM542. It's a lower version, so it doesn't have the same features as the one I need. It's very annoying and in bad taste to be sold something while pretending it's something else.I definitely do not recommend this product. Don't buy it.
K**R
Makes it very easy to interface steppers.
I used three of these to run an XY table for PCB drilling, driven by a Raspberry Pi Zero. They make interfacing to steppers much easier than building your own. The instructions on use can be a little confusing, but as far as I can tell, if you wire it wrong or put the switches to an invalid setting, there is no damage. And it is easy to find help online for settings and use.The picture is the prototype kluge that I built to design the system. Its first use is to make a PC board to make interface Mark 2, which will be much cleaner and without the scrambled wire nest. The three drivers are the devices with the green connector blocks.Recommended
K**R
Very smooth, runs cool.
I purchased this to control a nema 17 stepper. I was using a LM298n for prototyping my automatic chicken coop door controller but they ran very hot which caused erratic movement. I have been using this to move a two pound door up and down twice a day for over a month in the Texas triple digit heat. I will definitely buy more at this price for a few more projects to include a desktop cnc router.
Trustpilot
3 weeks ago
1 month ago