


🔩 Unlock Your Mechanic Potential!
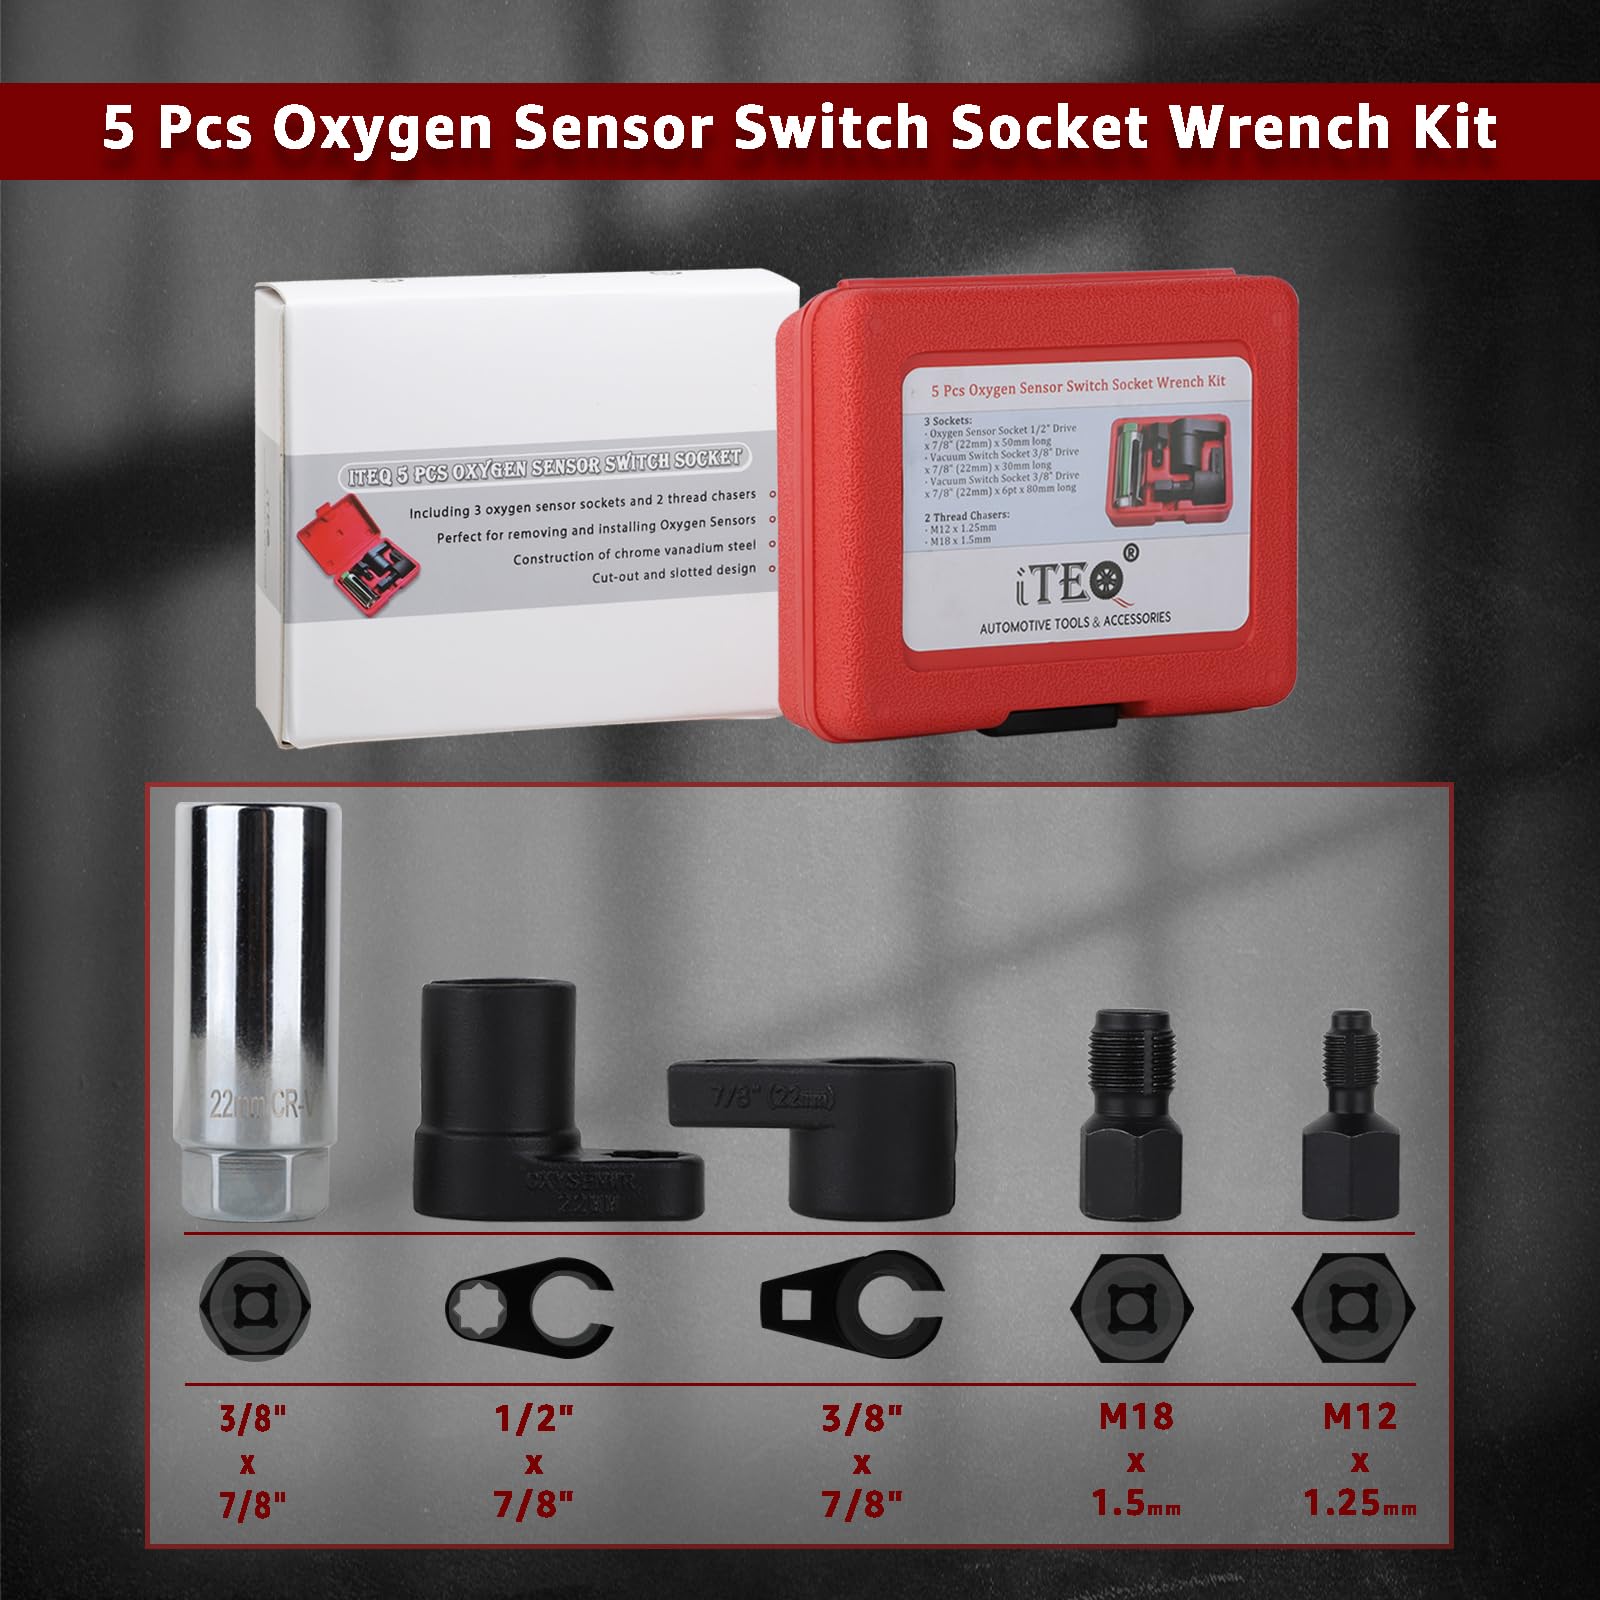
The 5 Pcs Automotive Oxygen Sensor Socket Wrench Remover Tool and Thread Chaser Set is an essential toolkit designed for automotive professionals and DIY enthusiasts alike. This set includes three types of universal socket wrenches, a 6-point 7/8” socket opening, and specialized thread chasers, all crafted from durable chrome vanadium steel. Perfect for removing, inspecting, and replacing oxygen sensors on most vehicles with computer-controlled engines, this toolset ensures precision, ease of use, and longevity.


| Color | Black White |
| Brand | ITEQ |
| Material | Chrome Vanadium Steel |
| Item Length | 0.08 Meters |
| Item Weight | 820 Grams |
| Item Package Quantity | 1 |
| Head Style | Hex |
| Finish Type | Polished |
| Operation Mode | Mechanical |
| Manufacturer | ITEQ |
| UPC | 607111538424 |
| Part Number | IT017 |
| Item Weight | 1.81 pounds |
| Country of Origin | China |
| Item model number | 13 |
| Size | 7/8” 3/8” 1/2” |
| Finish | Polished |
| Batteries Included? | No |
| Batteries Required? | No |
H**K
DON'T DICK AROUND - USE THE PROPER TOOLS....
UPDATE: Bosch states NOT to use any dialectic grease on their O2 sensor connectors. Seems that their sensors receive the required ambient air sample via the air traveling under the wire insulation of the harness. This seems UFB but my saving grace was that I only used a bit of DG on the face of the O2 sensor socket. The added pix of the OBD2 reader data stream DOES show a proper high/low voltage swing of both of my two new upstream sensors. (My old O2 sensors did read a similar high voltage- rich - but the low voltage swing never went below ~.6 .7 volts - again staying rich for most all of the time.After buying the LAUNCH 529 Code Reader from Amazon - ASIN - B0811JXH3M , I checked the output signal of my O2 sensors, (nice, real-time waveform), I noticed the Bank 1 sensor 1 (driver side), was indeed fluctuating, but, was not switching low enuf to indicate proper sensor operation. So, with about 50K miles PAST the recommend change interval, I ordered/received 4 of the Bosch 15510 O2 sensors from the "rocky place" for 110 bucks delivered. For my 08 RAM 1500 5.7 HEMI 2WD Quad Cab, the VIN number contained the "2" vehicle build descriptor and not the "D" descriptor which DOES make a difference. The OEM Dodge MOPAR PN for my truck is 56029049AA, used at all four locations. Anyway, from reading all the blogs and watching YT videos, I was getting ready for a VERY difficult time in the removal of these 149K mile original OEM sensors. (The pix show the old sensors were damn near disintegrated). I knew that I should not rely on the 22mm Craftsman OE side of the combination box wrench as the primary tool for the job and to be ready, I bought this socket kit. Others had stated that the longer chrome slotted socket would probably open up with the torque that may be required for removal, and some had suggested using a SS band clamp on the socket to keep the slotted socket from expanding. (didn't like that idea). AND, the long slotted socket WOULD NOT allow placing over the sensor wires and seat fully on the sensor hex portion. The bit longer slotted heavy crows-foot has a preferred 1/2 inch drive but had much thinner sidewalls than the shorter slotted crows-foot, which was a 3/8 drive. (see pix). As I wanted to remove ALL sensors intact, without cutting off the wires and using the 22mm 6 point DW socket, my thought was to use the shorter, slotted heavy crows-foot even though it was for a 3/8 drive. I was ready with the socket adapters - 1/2 to 3/8 adapter so to be able to muscle any tight sensor with the preferred 1/2 ratchet. For sheets and grins, I tried my Craftsman 22mm OE wrench, yea, I know, you shouldn't, but, I was able to loosen three of the four sensors with this OE wrench due to open access to the sensors and got lucky - and the fourth sensor - see short slotted heavy socket on sensor in pix - was easily removed with a 1/2 ratchet with the 1/2 to 3/8 adapter. Using a 1/2 ratchet provided a finer loosening and tightening movement in very small increments, not like being restricted to a socket on a square 1/2 drive breaker bar, you know what I mean, when there is little “throw” in the ratchet movement.FYI – My truck was basically cold with only several minutes running to move from the carport to my flat(er) driveway. The exhaust system was just warm, not hot, when I started work. The picture where you can see the short heavy crows foot socket on the upstream side is from bank 2, passenger side for reference. The very open sensors shown in another pix are of the bank 1, driver’s side for reference.I did not have to use “plan B” using the 1/2 drive 6 point 22mm DW socket which was to work on a cold exhaust system with cut wires for the 6 point 22mm DW socket use, heat the sensor bung only with a small torch, not the sensor itself, then after the bung was HOT, I had freeze spray ready to cool ONLY the sensor, (on the hex wrench part), so it would contract from the HOT sensor bung and make sensor removal easier. This plan was at the ready but did not have to use as all sensors only required ~20-25 ft lbs torque to remove and was easily accomplished with the 22mm OE wrench on three sensors. The fourth sensor, bank 2, upstream – shown in pix, needed the short heavy crows foot socket. (This new “pounds feet” designation is BS due to some sob’s decision to be more “politically correct”. To that I say STFU……… For me it will always be ft lbs… A good suggestion is to make certain you CAN loosen ALL of your sensors FIRST, NON-DESTRUCTIVELY, and NOT disconnecting any connectors, before changing any, since this is the hardest part you DO want to accomplish FIRST, and, IF you could not remove any of the sensors yourself, you would need to only retighten your sensors a bit for your drive to the shop for removal if needed. The rest is all downhill easy peasy…. My work time was about 2 hours or so, due to 2 years previous back surgery and not having a creeper, which was a real biatch…. P.S. ALWAYS use dielectric grease on electrical connectors and plugs to prevent any moisture or water intrusion. Just squeeze a small bit on the “face” of the new sensor connectors as shown in the pix with a small amount pushed into the connector “holes” and you’ll be good-to-go….
J**E
Good Quality
The product is of good quality and the case is sturdy. It helped me remove a sensor from my 2014 Nissan, it worked perfectly and was very easy to handle. I recommend it.
O**X
Nice kit
Nice kit. Sturdy blown molded plastic case. Each piece has its own place. Used to remove oxygen sensor on 2009 Scion xB. Worked well. Would recommend.
C**N
I managed to break one.
These work, although I did manage to break one. That might have been my fault. I have an old Volvo, and every part is tucked somewhere unreachable. O2 sensors are in a very difficult spot. Using this tool I was able to replace them, but I snapped one of these while trying to loosen a sensor. I used the smaller socket and it worked fine. Also for 22mm sockets they fit just a tad loose, but tight enough to do the job.
E**L
excelente
10 de 10
W**.
Great product!
I highly regiment this! It worked very well.
O**S
Tener fundamento ante todas las cosas
Si el producto cumplió su objetivo
K**N
Always use the right tools.
This is the right tool for O2.
Trustpilot
5 days ago
2 weeks ago